Animations on a Display Powered by a $ Wi-Fi Controller
If you walk by the Moddable office in downtown Palo Alto, you'll see a collection of eye-catching screens in the window. The latest to be added is a Moddable One displaying a series of animations. If you can't make it by the office, you can see the animations in this video.
To a casual observer, the animation is fun and eye-catching. But a more observant viewer might notice the tech specs on the card next to the screen and realize this particular series of animations on this display is actually kind of amazing. This display is powered by an ESP8266--a $1 Wi-Fi controller from 2014. And yet, the quality of the animation is spectacular.
These high-quality visual results are possible using the Moddable SDK along with a combination of careful design and implementation. This blog post explains why we think that matters, and explains some of the techniques that designers and app developers can use to get similar results in their own products.
Why is this interesting?
There are many advantages to incorporating a display--especially a display with a touchscreen--into an IoT product. Displays can convey much more information than blinking lights, allow users to perform sophisticated interactions directly on the device, and make a product more attractive. Yet, relatively few IoT products include displays with touch screen user interfaces. Manufacturers most often cite cost as the reason--and not just the cost of the display. There's also the cost of the software, a more powerful microprocessor to drive the display, engineers with the skills required to implement user interfaces on embedded systems, and so on.
New technologies, including the Moddable SDK, have brought the cost way down. But, many manufacturers have not yet realized it. Moddable works hard to bring cost effective displays to more IoT products by showing what's possible on inexpensive hardware. Our blog post Cost effective displays for digital products summarizes some of our work towards this goal. Our CEO Peter Hoddie and I wrote a book called "IoT Development for ESP32 and ESP8266 Using JavaScript" that includes an entire chapter about why displays are great, the challenges manufacturers have faced adding them to their products, and how the Moddable SDK makes it much more feasible today than it was in the past.
The animated window display is one more demonstration of the kind of visual results that are possible on inexpensive hardware.
Designing animations for microcontrollers
At Moddable we often say we want to build user interfaces for embedded products that look like the interfaces that users are accustomed to on mobile platforms. That's difficult because embedded platforms are not at all like mobile platforms. They are much less powerful. They are a unique type of hardware with their own advantages and challenges. Getting those kinds of results starts during the design process, because designers have to design for the constraints.
For example, one key constraint on Moddable One is the speed at which the ESP8266 can transmit pixels to the display. Designers should try to limit the number of pixels that change in each frame to accommodate for this constraint. As a general rule, we try to design animations so they only change about 20% of the pixels on the screen each frame. Animations that change more than that often don't look fluid or end up tearing when they're running on a device.
Some tearing may be acceptable. For example, if you look very closely at a Moddable One running the window display animation you can see tearing on the screen with bubbles for each day of the week. However, the tearing is hardly noticeable when viewed from outside, so we decided it was acceptable.
Keep in mind also that the Piu user interface framework in the Moddable SDK calculates and draws the screen only in areas that need to be updated, which means that the changing pixels do not need to be contiguous.
With some clever design, you can create animations that look like full-screen animations, even though only a small percentage of the pixels are actually changing. The balls example, shown in the gif below running on our desktop simulator, demonstrates this well. In this example, there are four 30 pixel square balls moving at different speeds around the screen. It looks like most of the screen is changing constantly, but only about 9% of the pixels actually change per frame. When run on a Moddable One, this example runs at over 130 frames per second.
Piu keeps track of which parts of the screen need to be redrawn automatically without any work by the app developer. This is useful because the developer does not have to figure out which pixels to "erase" when drawing the next frame of an animation, and because erasing pixels and drawing new ones can be done in a single step. To demonstrate the difference combining the erase and redraw steps make, consider this simple animation implemented using the Moddable SDK (left) and the well-known Adafruit GFX library (right). Both are running on an ESP8266 connected to a QVGA display using a SPI with a single data line.
The app built with the Adafruit GFX library does not know when to redraw pixels unless it is explicitly told to. Before the text is drawn further down on the screen, a blue rectangle has to be drawn over its old position. Because each step is done done separately, you end up with a lot of flicker and a choppy animation. The app built with Piu does both steps at once, so there is no flicker and the animation is very smooth.
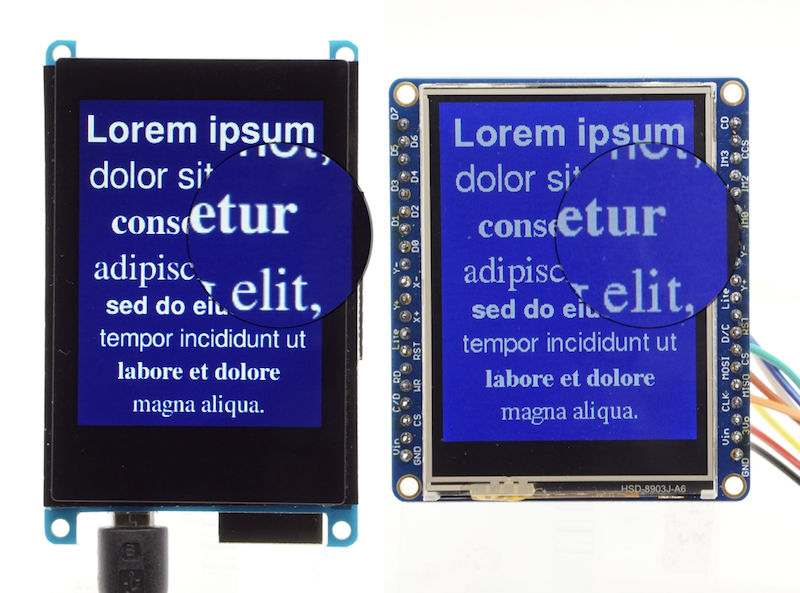
You may not be able to distinguish clearly in the video, but the text rendered on the Moddable One looks much nicer too. That's because Piu supports 4-bit anti-aliased grayscale fonts, whereas Adafruit GFX only supports 1-bit monochrome text. The image below shows a close-up comparison of text drawn using Piu (left) and the same text drawn using the Adafruit GFX library (left).
Implementing animations
If you've only worked with graphics libraries like Adafruit GFX, creating the animations you see in the window display may seem like an insanely difficult task to you. But creating these types of animations with the Piu user interface framework is actually pretty straightforward. As with all software APIs, there is a learning curve. The Piu documentation is a great reference for developers as it provides complete documentation for every Piu class, but chapter 10 from our book is by far the best resource to learn the basics of Piu. With some practice (and with a designer willing to work with the constraints of embedded systems!) implementing user interfaces and complex-looking animations becomes surprisingly easy.
This app uses the Piu Timeline class to create all of the animations. The Timeline class is based on the TimelineLite class by Greensock used by countless websites.
A Piu timeline consists of a set of tweens, each of which describes how one or more properties of a content object change from an initial value and an ending value. For example, you might add a tween that specifies that a label object should move from the top of the screen to the bottom of the screen, or a tween that specifies that an image should go from opaque to transparent.
Tweens are added to a timeline object using from, to, and on methods. All three methods accept the same arguments:
target – the content object to animateproperties – a dictionary whose keys are properties
of the target object to animateduration – the duration of the tween, in millisecondseasing – (optional) an easing function to use for the tweendelay – (optional) the number of milliseconds that this tween should start after the previous tween in the timeline completes; defaults to 0
The next sections shows how these methods are used in a two of the animations in the window display app.
A simple linear animation: the Moddable logo animation
The Moddable logo animation (shown in the video below) consists of simple linear movements and a fade out at the end. Lines 39-91 of the screens module implement this animation.
Implementing these types of animations is straightforward with the to and from methods.
- Use the
to method to ease the properties of the target object from its original values to the target values specified in the properties object over duration milliseconds.
- Use the
from method to ease the properties of the target object from the values specified in the properties object to the original values of the target object over duration milliseconds.
The original values of the target object are the values specified in the constructor of the target object. The code below shows the call to the constructor for the square Moddable icon and the text that says "moddable". The square Moddable icon starts with a y value of 100 and an x value of 19. The text that says "moddable" starts with a y value of 120 and an x value of 49.
const ModdableLogoScreen = Container.template($ => ({
    ...
    contents: [
        Content($, {
            anchor: "ICON",
            top: 100, left: 19,
            Skin: ASSETS.ModdableIconSkin
        }),
        Content($, {
            anchor: "MODDABLE",
            top: 120, left: 49,
            Skin: ASSETS.ModdableLogoSkin
        }),
        ...
    ],
    ...
}));
To implement the sideways animations of these two objects, I used the from method.
The square icon moves from an x value of 83 to the original value of 49 over the course of 350 milliseconds. To make the animation look smoother, I used the Math.quadEaseOut easing equation, which causes the animation to slow down slightly as it ends. There is an 860 millisecond delay here because the screen is still briefly at the start of the animation.
timeline.from(data["ICON"], { x: 83 }, 350, Math.quadEaseOut, 860);
On its own, this tween looks like this:

The text that says "moddable" moves from an x value of -data["MODDABLE"].width (which is just off the left side of the screen) to the original value of 49. It also goes from having a state of 1 to the original value of 0. This causes it to go from being transparent to opaque (see the Variant, Variants, State, and States section of the Piu documentation for more details on this). This tween also lasts 350 milliseconds, and again I used the Math.quadEaseOut easing equation to make it look smooth. There is a -350 millisecond delay, which means that it starts 350 milliseconds before the previous tween (of the icon) ends; in this case, the previous tween also lasts 350 milliseconds, so the two tweens will start and end at the same time.
timeline.from(data["MODDABLE"], {
        x: -data["MODDABLE"].width,
        state: 1
    },
    350, Math.quadEaseOut, -350);
These two tweens look like this:

You may have noticed in the full animation of this screen that the square Moddable icon starts as a complete square, and as the square and the text that says "moddable" move linearly, part of the square icon fades out. This part of the animation is implemented using a separate content object and a to tween. The code below shows the call to the constructor for this content object.
const ModdableLogoScreen = Container.template($ => ({
    ...
    contents: [
        ...
        Content($, {
            anchor: "ICON_CLOSE",
            top: 114, left: 151,
            Skin: ASSETS.ModdableIconCloseSkin
        }),
        ...
    ],
    ...
}));
The state property of this content object is 0, because none is specified in the constructor and the default value is 0. In this app, that means it starts out being opaque and white. To fade it out, I used a to tween that changes the state to 1, which makes it transparent. This happens over the course of 50 milliseconds, and starts at the same time as the first two tweens.
timeline.to(data["ICON_CLOSE"], { state: 1 }, 50, Math.quadEaseOut, -350);
These three tweens look like this:

All but one of the other tweens in this timeline use the to and from methods, so most of the code for this screen should be easy enough to understand. The next section will cover the on method.
A non-linear animation: the color picker screen
The color picker animation (shown in the video below) uses nonlinear movement for the crosshair. It also changes text that displays the hex color code of the crosshair's focus. Lines 364-458 of the screens module implement this animation. If you've read our blog post on A Color Picker for Microcontrollers, the code for calculating the color and updating the text will look familiar. In this section, we'll focus on how the crosshair movement is implemented.
Implementing nonlinear animations like this is just as straightforward as linear animations with Piu timelines using the on method. The on method eases the values of the target object through a sequence of steps as specified by arrays in the properties object over duration milliseconds. The series of x and y coordinates for the crosshair are stored in the crosshairX and crosshairY arrays, shown below (more on how these values were determined later).
const crosshairX = [85,70,55,41,29,19,13,11,14,25,39,54,70,85,100,114,127,132,133,130,128,132,144,144,144,144,154,164,173,179,184,188,192,195,200,210,215,225,240];
const crosshairY = [-69,-61,-52,-42,-31,-17,-1,16,32,46,56,64,71,78,86,96,109,119,131,143,155,165,168,168,168,168,166,161,154,145,135,125,114,104,94,92,89,88,85];
The animation of the crosshair is implemented with a single tween, created by calling the on method of this screen's timeline. The arrays of coordinates are passed in as the values for the x and y keys in the properties object. The tween lasts for 1700 milliseconds, and starts 100 milliseconds after the previous tween. I used the Math.linearEase easing equation here because I didn't want the crosshair's speed to change throughout the animation; I wanted each step of the sequence to last the same amount of time.
timeline.on(data["CROSSHAIR"], { x: crosshairX, y: crosshairY }, 1700, Math.linearEase, 100);
On its own, the tween looks like this:
The other tweens in this timeline are created using the to and from methods, so the rest of the code for this screen should be easy enough to understand. However, I should explain how the values for the x and y coordinates were determined. The short answer is that our Creative Director, Chris Krueger, designed the animation in After Effects. He then exported a list of coordinates for me to use. If you want to learn how to do this yourself, read the next section. Otherwise, you can skip to the end.
Getting coordinates from After Effects
After Effects is a popular tool for designing animations. Unfortunately, the animations cannot simply be dropped into an embedded product. A common challenge for developers is replicating the animations in product code. For this animation, I extracted the coordinates of the animated object from After Effects to use in the app.
To export a list of coordinates from After Effects, first take the following steps:
- Convert all the Expressions for an object to keyframes.
- Select all of the keyframes.
- Select Copy from the Edit menu (or use the hotkey ctrl+C)
- Paste what's on the clipboard into a text document or spreadsheet
These steps are shown in the video below.
The data from After Effects looks something like this:
Adobe After Effects 8.0 Keyframe Data

    Units Per Second    30
    Source Width    60
    Source Height   60
    Source Pixel Aspect Ratio   1
    Comp Pixel Aspect Ratio 1

Transform   Position
    Frame   X pixels    Y pixels    Z pixels
    0   17  56  0
    1   17.9816 56.016  0
    2   20.8344 56.1489 0
    3   25.4008 56.6435 0
    4   31.465  57.8821 0
    5   38.7113 60.3357 0
    6   46.7014 64.4515 0
    7   54.9182 70.4852 0
    8   62.9167 78.4154 0
    9   70.4419 88.0209 0
    10  77.4121 98.998  0

End of Keyframe Data
The x and y coordinate data from After Effects is separated into two columns. This is great because you have to specify the x and y properties in two separate arrays in your Piu code, and it's straightforward to convert each column into a comma separated list that you can copy into your arrays. Piu doesn't support non-integer coordinates, so I convert the values to integers before copying them into the app too.
Try it yourself!
With inexpensive microcontrollers like the ESP8266 and powerful software like the Moddable SDK, adding displays to IoT products has never been easier. Learning to implement animations with Piu takes some practice, but if you're building an IoT product, it is well worth the effort. You can start learning today by downloading the Moddable SDK and checking out some of our examples. And, of course, if you need help you can reach out to us in our Gitter chatroom or open an issue on GitHub.
If you're interested in learning more about Moddable One, check out the product page on our website. The window display app also runs on Moddable Two and other ESP32-based development boards supported by the Moddable SDK, including M5Stack and M5Stack Fire.