HACKberry Bionic Hand
HACKberry is a 3D-printable bionic arm project managed by Mission ARM Japan. The goal of HACKberry is to make inexpensive prosthetics more widely available by significantly reducing the cost. The HACKberry arm is also remarkably customizable for users because both the hardware and software are open source. Naturally, we at Moddable were very interested when we heard about it. This blog post details our experience building a HACKberry bionic hand customized with an important addition: a built-in touchscreen.
About the HACKberry bionic arm project
The HACKberry project has been active for several years. It is available exclusively under an open source license so developers from all over the world can build the project themselves and share their improvements.
Since the design files are open source and available on GitHub, you can 3D print the parts yourself. Alternatively, you can purchase the parts or a fully assembled hand like the one shown below.
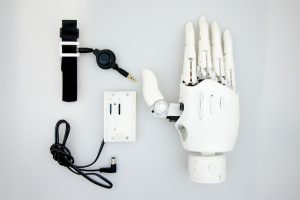
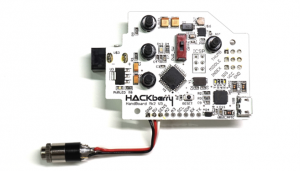
Servos control the motion of the joints, and HACKberry sells an Arduino-compatible circuit board with small joysticks that you can use to control the servos.
Building a HACKberry hand, Moddable style
In building our own version of the HACKberry hand, we wanted to bring some of the benefits of Moddable's work to the project. We focused on two: scripts and screens.
Scripts
We decided to use JavaScript to control the behavior of the hand. Switching from the C/C++ code used in the original HACKberry to JavaScript makes it easier for more people to customize the software, which is consistent with the goal of the project to make the hand more accessible to more people. We found that responsiveness of the hand to commands using the JavaScript implementation is still excellent.
Screens
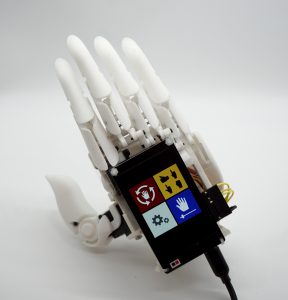
We often talk about how adding displays can improve products and about the benefits of using JavaScript instead of C/C++ for embedded development. The HACKberry is a great project to try that out. So, instead of using the HACKberry circuit board and an Arduino to control the servos, we added a touchscreen user interface with on-screen controls. The screen is part of a Moddable Two, which is powered by an ESP32 and programmed in JavaScript using the Moddable SDK. Full instructions for putting together your own Moddable style HACKberry hand are available in this GitHub repository.
The display on the Moddable Two allowed us to create an intuitive UI to control the motion of the fingers. The joysticks of the original design are replaced by the application running on the Moddable Two. The onscreen sliders let you control the servos to move the fingers.
The display allows us to add features that go beyond what is possible with the circuit board and Arduino combination. One such feature is the ability to program specific gestures, which allows the user to quickly configure the position of all three sets of fingers. One of the screens in the application displays a list of icons representing each gesture. Tapping on an icon moves the servos into the same position.
Another screen allows you to play a series of pre-programmed gestures one after another by tapping a play button.
Finally, we added a screen that allows you to calibrate the minimum and maximum angle of each individual servo. It may be desirable to limit the motion of the servos based on the servos you use or the construction of your 3D printed parts. For example, in an early prototype we built, rotating the index finger over about 160 degrees resulted in some of the printed parts overlapping in a way that locked them in place. This calibration screen allows us to prevent that from happening.
Understanding the code
The source code for the application we built is available in the app directory of the GitHub repository. This section summarizes the role of each module in the application and provides links to documentation for relevant Moddable SDK features.
User interface
The application uses Piu, our user interface framework designed for microcontrollers. The implementation of all user interface elements is contained within assets.js and screens.js. The assets module defines the colors, fonts, and images used throughout the application. The screens module uses the objects defined in the assets module to render each screen in the application.
Interacting with the servos
The application is designed to run both on the Moddable Two and in a simulator running on your computer. This allows you to run the application on the simulator to develop the user interface, then seamlessly switch to running on the device to work with the servos.
While most of the source code is the same between the device and simulator, there are some differences. When running in the simulator, there are no actual servos so those are simulated. When you run the application on the Moddable Two hardware, device/sensors.js is included in the build. This version of the file works with the Moddable Two hardware. When you run on the hardware simulator, simulator/sensors.js is included. This file simulates the servos.
The manifest is a JSON file that specifies which modules are included in each build. The modules object specifies modules that are included in all builds.
"modules": {
    "*": [
        "./main",
        "./assets",
        "./screens",
        "./gestures"
    ]
}
The platforms object specifies settings that are platform-dependent. In this application, the manifest specifies which sensors module to use for the esp32, mac, win, and lin platforms. This is a technique we often use to separate code for features that vary platform to platform.
"platforms": {
    "esp32": {
        "modules": {
            "*": [
                "./device/sensors"
            ],
        }
    },
    "mac": {
        "modules": {
            "*": [
                "./simulator/sensors"
            ]
        }
    },
    "win": {
        "modules": {
            "*": [
                "./simulator/sensors"
            ]
        }
    },
    "lin": {
        "modules": {
            "*": [
                "./simulator/sensors"
            ]
        }
    }
    ...
You can also specify settings that apply to any platform not explicitly mentioned by using the ... platform identifier. Since this application is only supported for the ESP32 and simulators, the manifest specifies an error message that is traced to the console if you try to build the application for another platform.
"platforms": {
    ...
    "...": {
        "error": "unsupported platform"
    }
},
For full documentation of manifests, see the manifest documentation.
Both the device and simulator versions of the sensors module export a Hand class with setMinimum, setMaximum, moveFinger, and doGesture functions. The device/sensors module implements the moveFinger and doGesture functions to control the motion of the three servos using the Servo class. Those same functions do nothing in the simulator/sensors module; they are stub functions to avoid exceptions when other modules in the application call them.
Application logic
The main.js module is responsible for switching between screens and interacting with the sensors module. It imports the Hand class from the sensors module, and the screens defined by the screens module.
import SCREENS from "screens";
import { Hand } from "sensors";
As in any Piu application, the main module exports an Application object. The application instance is accessed by other modules through the application global variable.
new Application({}, {
    commandListLength: 4096, displayListLength: 4096,
    top: 0, bottom: 0, left: 0, right: 0,
    Behavior: HandApplicationBehavior
});
The application object is assigned a behavior: HandApplicationBehavior, which is also defined in the main module. When the application launches, the behavior's onCreate method is invoked. Here it creates an instance of the Hand class and switches to the home screen.
class HandApplicationBehavior extends Behavior {
onCreate(application, data) {
    ...
    this.hand = new Hand({
        ...
    });
    this.doSwitchScreen(application, "HOME", data);
}
From there, the navigation between screens and calls to functions of the Hand class are driven by the user's interaction with the user interface. For example, when you tap the back button on any of the screens for a specific feature, the button delegates a switchScreen event to the application object, passing in "HOME" as a parameter.
application.delegate("switchScreen", "HOME");
This calls the switchScreen function of HandApplicationBehavior in the main module, which leads to a screen transition back to the home screen.
Another example is when you tap an icon from the list of pre-programmed gestures. Each icon delegates a doGesture event to the application object, passing in the corresponding gesture.
this.gesture = POINT_THUMB_OUT;
application.delegate("doGesture", this.gesture);
This invokes the doGesture function of HandApplicationBehavior in the main module, which calls the doGesture function of the sensors module.
class HandApplicationBehavior extends Behavior {
    ...
    doGesture(application, gesture) {
        this.hand.doGesture(gesture);
    }
    ...
Sharing our work
We've presented our JavaScript-powered, touch screen-controlled HACKberry hand at a few meetups and have been pleased with the response it has received. It's always the most eye-catching demo, and the benefits of incorporating a touchscreen user interface are obvious to the attendees. Many people immediately have ideas for additional features they'd like to see. We're sharing our work to allow more people to bring those ideas to fruition. We chose JavaScript instead of C/C++ to allow a much wider pool of developers to read it, understand it, and make it their own. And Piu, our object-oriented JavaScript user interface framework, is a much more natural fit for implementing touchscreen user interfaces than the C graphics libraries used by Arduino developers.
We were especially excited to be able to share our work with Genta Kondo at a meetup at DMM.make AKIBA. Genta started the HACKberry project at exiii, Inc. Genta was impressed by the touchscreen user interface and understood the potential it creates to add new and useful features to the product.
We are always on the lookout for projects that share our goal of opening products to customization by end users. Finding such a project centered around a product that improves the life of users was particularly exciting for us. We look forward to adding more features to our HACKberry hand and sharing the project with more developers.