Hacking the Sonoff B1 Lightbulb
At Moddable, we believe individuals should have control of the software in the products they own. Some people will use that control to write their own software, while others will use that control to choose the software that delivers the behaviors and privacy they design. Moddable's extensive work in JavaScript contributes to that goal by providing a common, mainstream programming language that can work in nearly every product.
Unfortunately, most products available today are designed to prevent their owners from seeing or modifying the built-in software. While we work to change that, we want to explore a world where we can control the software in our lives.
Fortunately, some products are hackable. While their manufacturers don't intend for us to change the software, they haven't taken steps to prevent it either. Sonoff makes a line of IoT products with integrated Wi-Fi. These include power outlets, wall switches, desk lamps, light bulbs, and more. Most of these are powered by a variant of the ESP8266 from Espressif. The team at Moddable knows this microcontroller well as it is the microcontroller we used to develop the current generation of our XS JavaScript engine and to power the Moddable One.
We decided to focus on the Sonoff lightbulb. The inherent simplicity of a lightbulb is intriguing. Homes have plenty of lightbulbs, providing many locations to experiment with customizable lightbulbs. And, as every Arduino programmer knows, step one is blinking an LED. With a lightbulb, we're just scaling up that fundamental exercise.
Sonoff Bulbs
The Sonoff B1 lightbulb is readily available on Amazon for $12 or $13. They are good bulbs, but not great. Their very best feature is their hackability. The brightness and color accuracy aren't going to win an award. That said, the bulbs are very reasonably priced and extremely reliable. Their physical design is consistent with many other Wi-Fi bulbs, so they look reasonable installed in your home.
Hardware
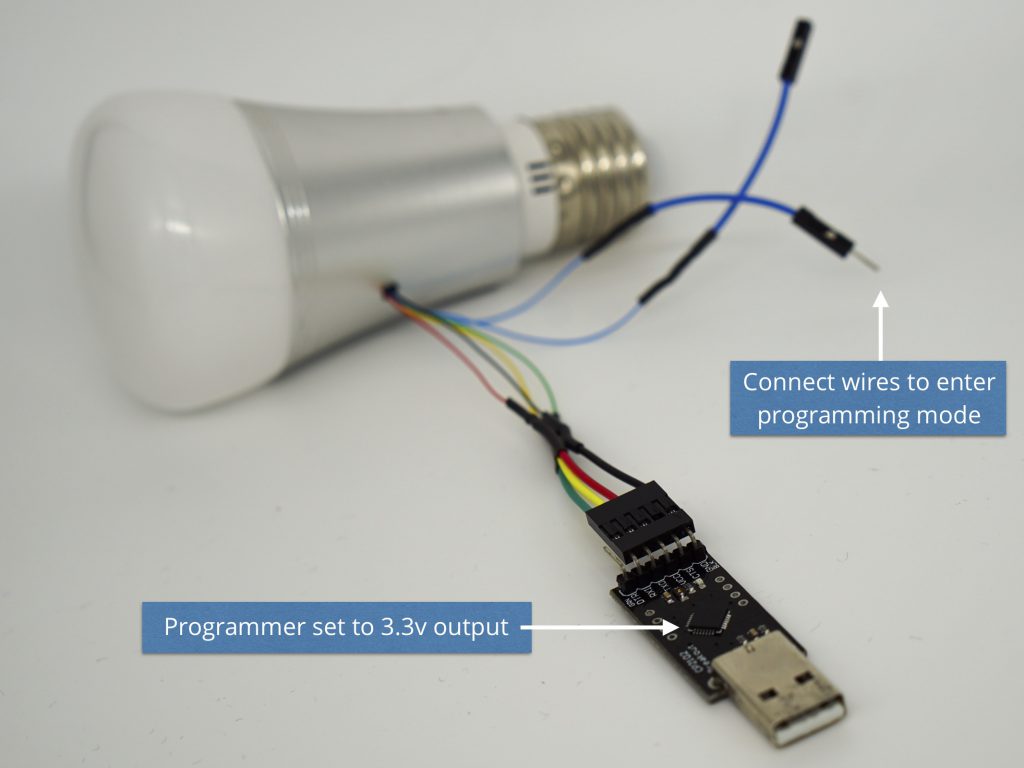
Sonoff doesn't prevent you from changing the software on their bulbs. On the other hand, they don't make it particularly easy. You'll need a soldering iron and some patience. When you are done, you'll need an FTDI programmer board too.
This section introduces the basics of attaching a programming interface to a light bulb.
Warning: Unplug the bulb. Never work on it when it is attached to power. Don't kill yourself. Don't kill your computer.
Original Work
Several people have independently figured out how to hack the Sonoff B1 hardware to add a programming connection. The work by Igor Kromin is particularly clear and served as the starting point for Moddable's work.
The downside of most of the existing work is that it results in wires hanging out of lightbulb. While functional, the result is not something that fits into most homes.
Moddable Work
The first step we took was to reproduce the work of Igor Kromin. That worked well.
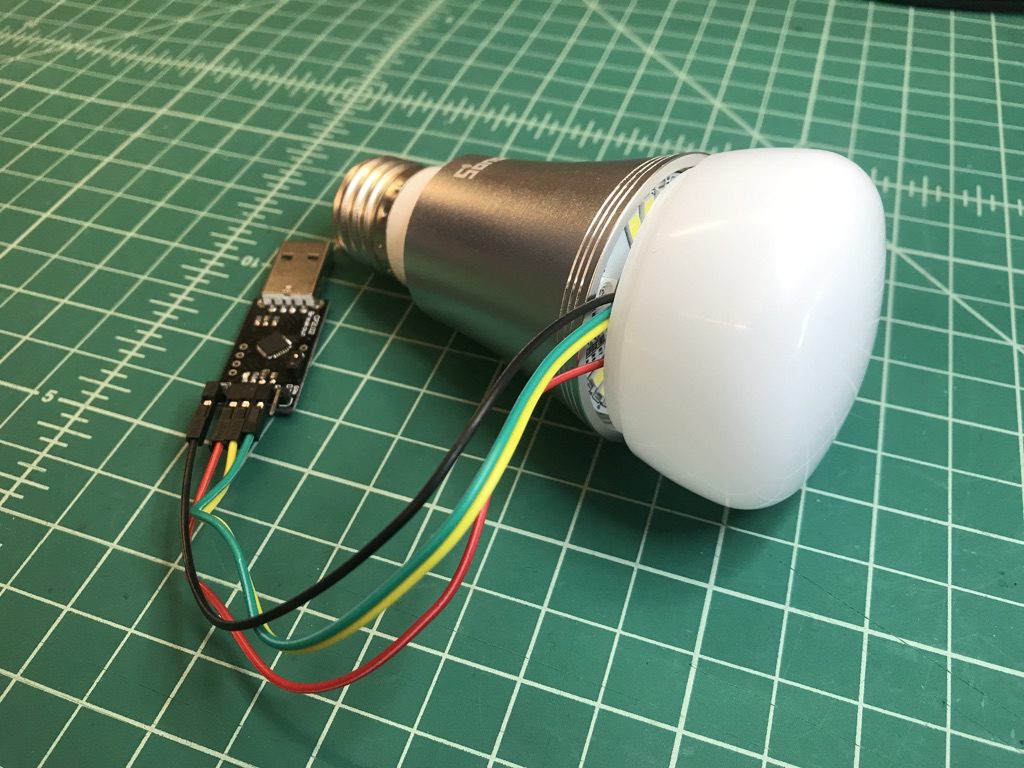
Unfortunately, it wasn't possible to put the diffuser back on top of the light bulb. That led to our second attempt. We drilled a hole in the heat sink.
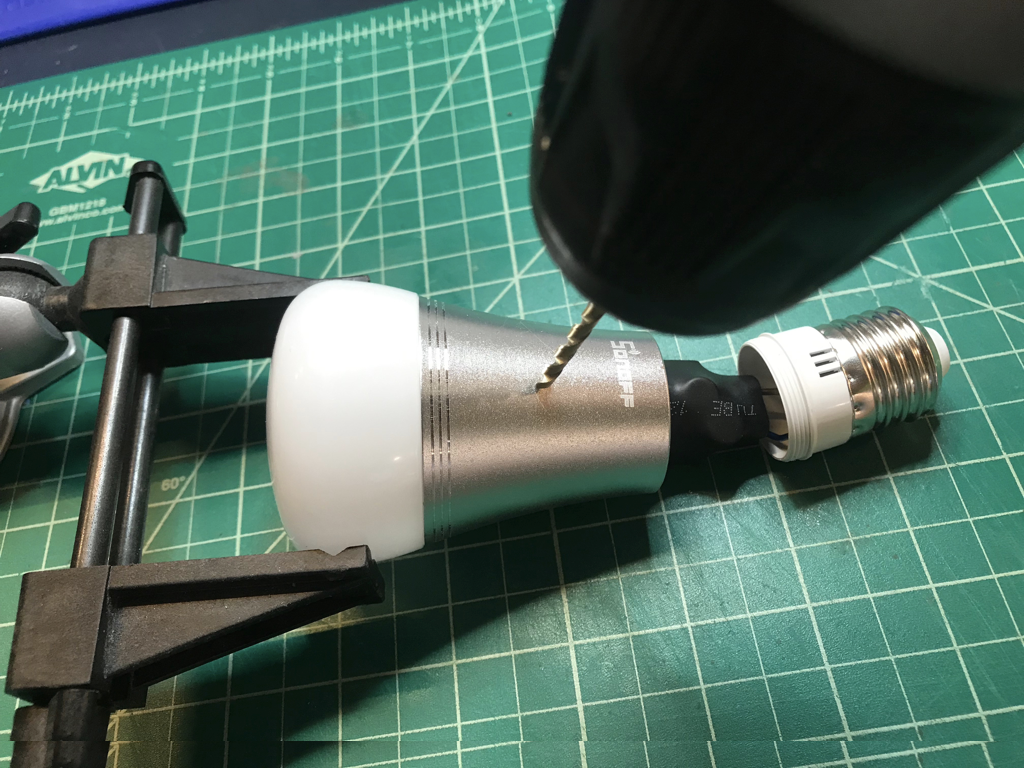
That allows the wires to be fed down through the heat sink and out the side.
With this change the light diffuser fits as designed.
This worked well for software development, but is still not appropriate for installation into a home. The third attempt is a little more complicated. We built a small custom printed circuit board (PCB) to install inside the bulb.
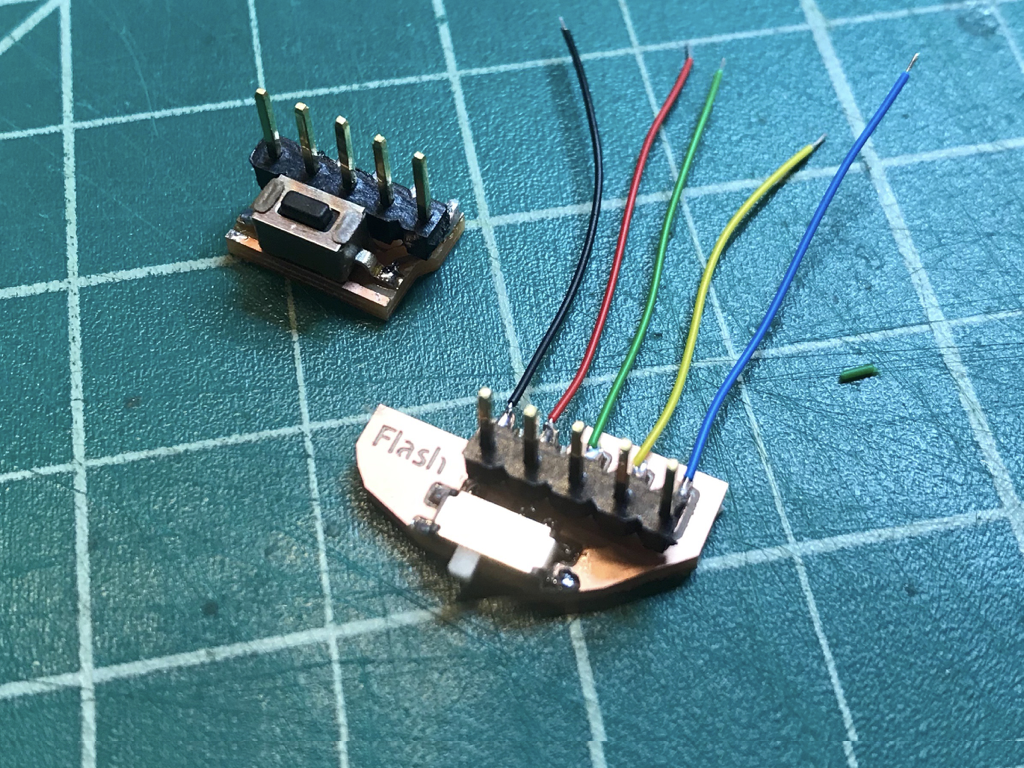
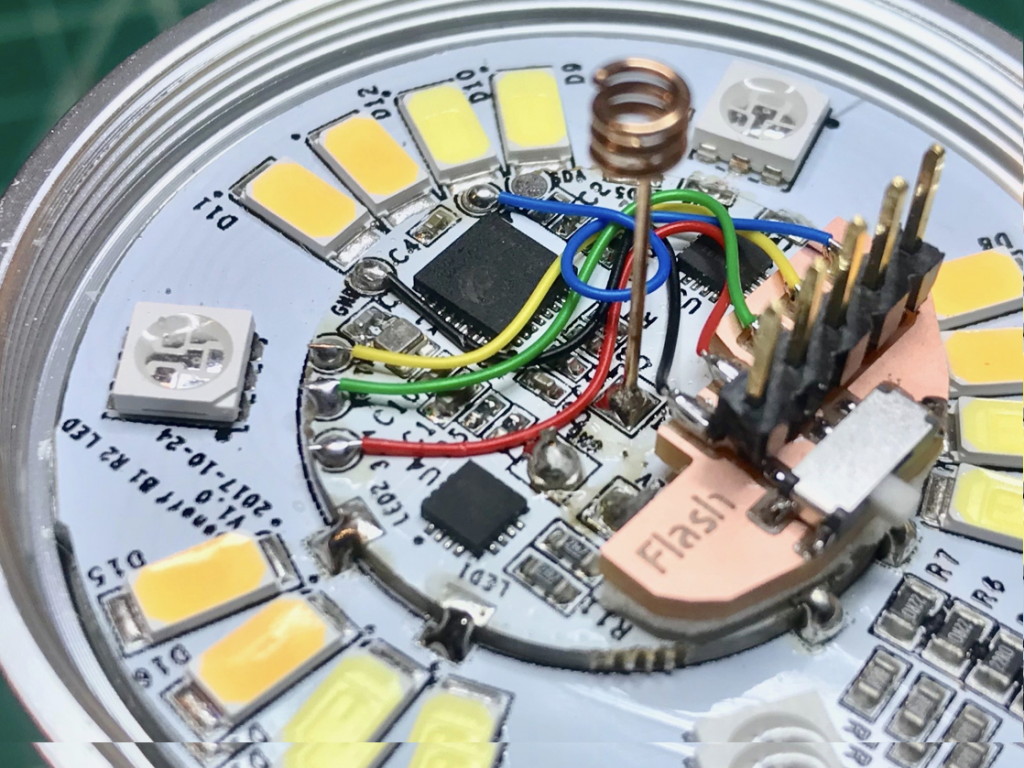
The board mounts next to the antenna and includes a small switch to move between programming and running modes.
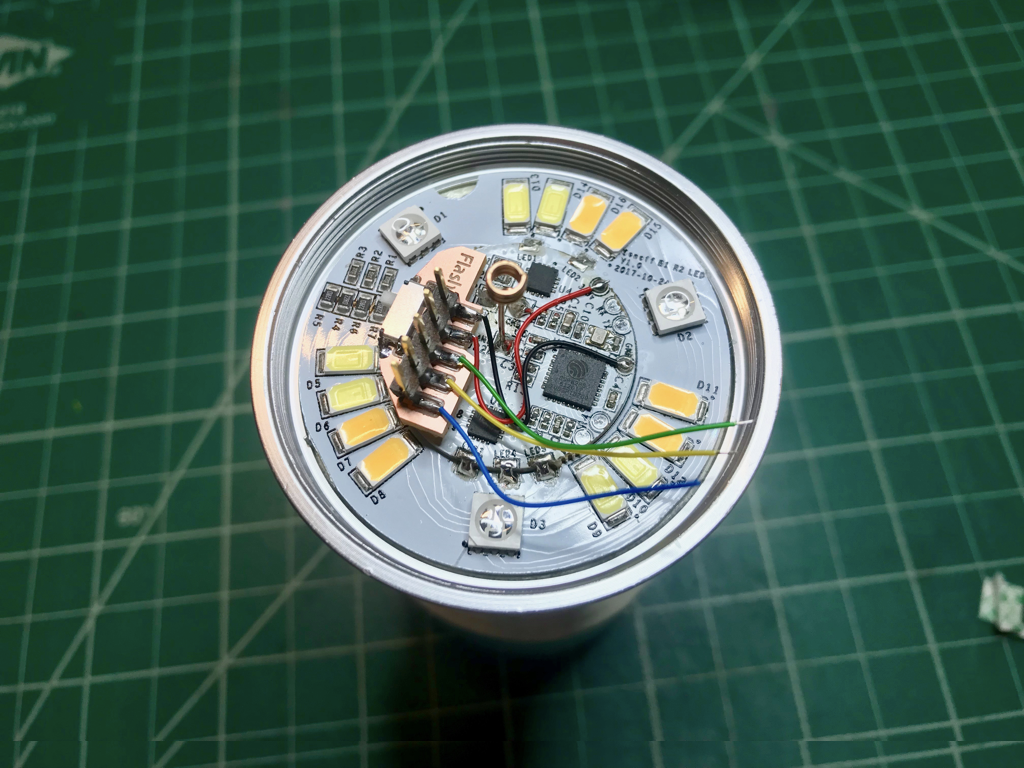
We used wires that are safe at high temperatures to wire the PCB to the pads on the lightbulb's PCB.
The result is small enough that the diffuser fits. With the programming board in place and the diffuser installed, the lightbulb looks the same as when it arrived from the factory. Now it is ready to go into a home.
The Moddable hardware modifications to the Sonoff B1 were designed and built by Chris Krueger.
Software
The programming interface makes it possible to program the lightbulb. To do that with the Moddable SDK requires two items: a build target for the lightbulb and a driver for the light.
Smaller Flash
The Sonoff B1 lightbulb uses the same basic ESP8266 part already supported in the Moddable SDK. However, it is a special package designed for high temperatures and low cost. The part number is ESP8285. From a software development perspective, the main difference is that it has only 1 MB of flash memory instead of 4 MB as used in Moddable One and many NodeMCU boards. To work with the 1 MB flash requires a linker script built for that purpose. There is one in the Moddable SDK.
The next step is a build target for the ESP8285 to build using that 1 MB link script. The esp/8285 build target is available for that, and works with the Sonoff B1.
mcconfig -d -m -p esp/8285
You can use this build target to run helloworld on the lightbulb, just as you do a Moddable One. The xsbug JavaScript debugger even works for scripts on the lightbulb. More interestingly, the network examples work too - HTTP client and server, WebSocket client and server, MQTT client, mDNS, telnet, and more. There's a lot of potential.
LED Driver
The Sonoff B1 lightbulb is an LED light. To control the LEDs requires an LED driver. Unfortunately, reprogramming the bulb overwrites the factory provided driver. Fortunately, the driver is not very complicated so it is straightforward to build one for use with the Moddable SDK.
The LED driver chip used in the Sonoff B1 lightbulb is from the My92x1 family by MY-Semi. The Sonoff-Tasmota project is an excellent reference for learning how to code for this part. Moddable's driver for the My92x1 is available in the Moddable GitHub repository. The driver is about 100 lines of C code, which includes both the driver itself and the JavaScript programming interface.
Working with the driver is very simple. First, import and instantiate the driver:
import MY92x1 from "my92x1";

let light = new MZY92x1;
The driver has just a single API, the write method. It takes 6 arguments:
- Warm
- Cool
- (unused -- set to 0)
- Green
- Blue
- Red
Each value ranges from 0 (off) to 255 (full brightness). To turn the light red:
light.write(0, 0, 0, 0, 0, 255);
To turn on both the warm and cool LEDS:
light.write(255, 255, 0, 0, 0, 0);
To turn the light off:
light.write(0, 0, 0, 0, 0, 0);
The driver interface is a minimal, low-level interface. It is small and efficient while providing direct access to the hardware capabilities. As you use it in your own projects, you may want to create a subclass that is more convenient for your particular uses.
Examples
This section introduces four example applications designed for the Sonoff B1 lightbulb. The first exercises the hardware capabilities to show the three different kinds of LEDs in operation. Each of the remaining examples shows a different behavior of a lightbulb. None of these behaviors is available in existing lightbulbs, yet they are trivial to implement in JavaScript using the Moddable SDK. Maybe some of the examples will meet a need in your home. Maybe they won't, but they will trigger your own ideas for a lightbulb behavior that would be useful. Once it is possible to change the software in your lightbulbs, you don't have to stop at ideas. You can implement your idea and try it out it in your home.
Note: In the movies below, the lightbulbs were operated at low brightness. This makes it easier to accurately photograph and is also safer for human eyes during development.
All of these examples run self-contained within the lightbulb. There is no active network connection. The microcontroller in the lightbulb supports Wi-Fi as does the Moddable SDK. You can make connected lightbulb applications too.
Blink
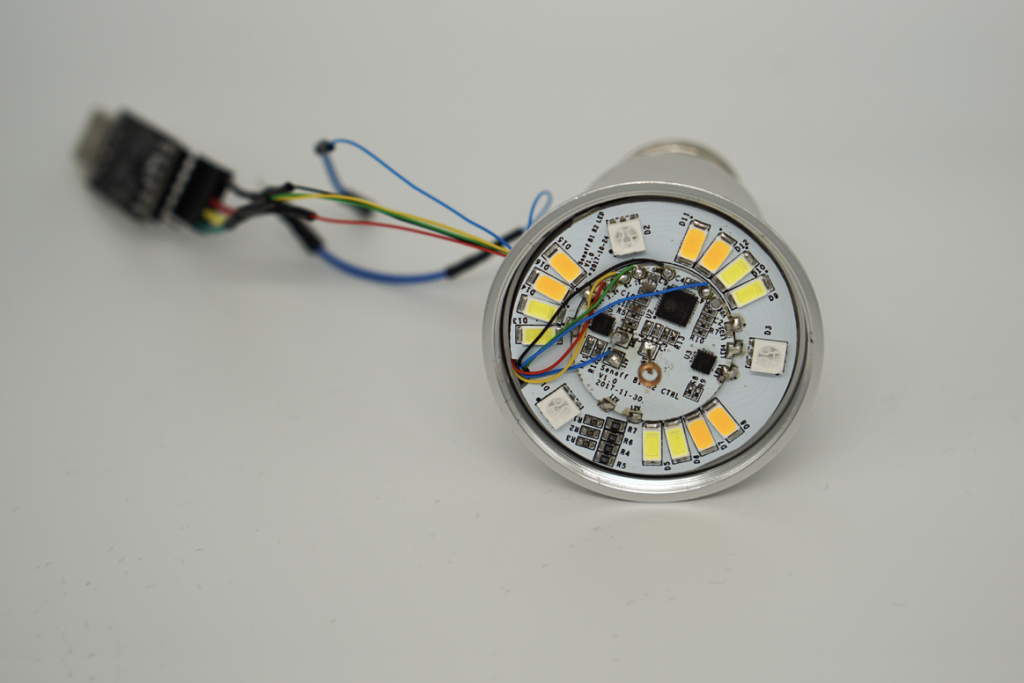
The Sonoff B1 bulb has three different kind of LEDs. There are color LEDS to display RGB colors, there are warm LEDs, and cool LEDs. There are several of each kind of LED located around the bulb. Each type of LED is independently controllable, allowing you to mix and match them however you like.
The blink example activates the three different kinds of LEDs to show where they are located. It begins by blinking the LEDs slowly and speeds up.
The following movie shows two versions of the lightbulb. The left side is with the diffuser in place, so you can see the effect of the LEDs on the appearance of the bulb. The right side is without the diffuser in place so you can see the individual LEDs.
The Blink example is in the Moddable SDK. Here's the code for the example:
let light = new MY92x1;
const brightness = 16;
let interval = 750;
let step = 0;

Timer.repeat(id => {
    switch (step) {
        case 0:     // red
            light.write(0, 0, 0, brightness, 0, 0);
            break;
        case 1:     // green
            light.write(0, 0, 0, 0, brightness, 0);
            break;
        case 2:     // blue
            light.write(0, 0, 0, 0, 0, brightness);
            break;
        case 3:     // warm
            light.write(brightness, 0, 0, 0, 0, 0);
            break;
        case 4:     // cool
            light.write(0, brightness, 0, 0, 0, 0);
            break;
        case 5:     // cool + warm
            light.write(brightness, brightness, 0, 0, 0, 0);
            break;
    }

    step += 1;
    if (step > 5) {
        step = 0;

        interval = Math.max(100, interval - 125);
        Timer.schedule(id, interval, interval);
    }
}, 750);
On Reminder
The On Reminder example is designed for situations where someone might need an occasional reminder that the light has been on for an extended period. That might be a reminder to take a break or finish a task. For example, it might be programmed to flash a color briefly once an hour as a reminder to get up to stretch. To keep the demo movie brief, this example is programmed to wait 5 seconds after the light has been turned on and then blinks blue briefly.
The On Reminder example is in the Moddable SDK. Here's the code for the example:
const light = new MY92x1;
const brightness = 16;
const interval = 5 * 1000;      // five seconds

light.write(brightness, 0, 0, 0, 0, 0); // warm

Timer.repeat(() => {
    light.write(0, 0, 0, 0, 0, brightness); // blue
    Timer.delay(250);
    light.write(brightness, 0, 0, 0, 0, 0); // warm
}, interval)
Fade
There are often some lights in a home that are not intended to be left turned on for an extended period of time. The Fade example operates the light normally until a predefined period of time elapses. It then fades the light. This example fades the light to just barely on, so no one is left in the dark. However, in some situations it might be appropriate to turn it all the way off, for example a closet light probably doesn't need to be on for several hours. The fade can be fast, or might progress over several minutes to give someone a chance to get-up and power cycle the light to keep it operating.
In this example movie, the light begins to fade after five seconds, and takes two seconds to fade to just barely on.
The Fade example is in the Moddable SDK. Here's the code for the example:
const light = new MY92x1;
const onBrightness = 128;       // 50 %
const onTime = 5 * 1000;        // five seconds
const fadeDuration = 2 * 1000;  // two seconds
const fadeStep = 10;
const fadedBrightness = 12;     // 10%

light.write(0, onBrightness, 0, 0, 0, 0); // cool

Timer.set(() => {
    let brightness = onBrightness;
    let step = (onBrightness - fadedBrightness) / (fadeDuration / fadeStep);
    Timer.repeat(id => {
        brightness -= step;
        if (brightness <= fadedBrightness) {
            brightness = fadedBrightness;
            Timer.clear(id);
        }
        light.write(0, brightness, 0, 0, 0, 0);
    }, fadeStep);
}, onTime);
Morse Code
The Morse Code example is a little more obscure, but shows that a simple lightbulb can be put to increasingly specialized uses. Morse code works by transmitting a series of dots and dashes. This is usually done with audio, but light works just as well. In this example, a string is converted to dots and dashes which are then blinked continuously on the light. Morse code has precise rules about the relative timing of the pulses:
- A dot is one beat
- A dash is three beats
- One beat between dots and dashes within a letter
- Three beats between letters
- Seven beats between words
The details on Wikipedia are all that is needed to implement the algorithm. The conversion from a string to light pulses is straightforward in JavaScript.
In the demo movie, the first three letters are the classic SOS Morse code message. If you know Morse code, you can decode the rest of the message; otherwise, consult the source code.
Conclusion
The number of devices in our homes powered by microcontrollers is increasing rapidly. These devices have a tremendous amount of untapped potential that can be unlocked by empowering individuals to experiment with their own software. The Sonoff B1 Lightbulb is an excellent product to use to explore what it means to truly take control of the digital devices in a home. The Moddable SDK brings the power and flexibility of JavaScript to lightbulbs, giving professionals and hobbyists the ability to bring their ideas to life.