Web Services Series Part 1: Working with REST APIs

The Moddable SDK includes modules that implement a variety of networking protocols, giving developers the flexibility to build applications that interact with all sorts of other devices and cloud services. A common way to communicate with cloud services is through RESTful APIs, which are based on HTTP.
You can find several basic example apps that communicate with web services in the http and services folders of our open source repository, including the streaming-adafruit-io example app which sends data to the Adafruit IO streaming service. This document explains how this app was written based on the Adafruit IO REST API documentation, together with general information about implementing REST APIs using the Moddable SDK.
Note: This document assumes you have a basic familiarity with the Moddable SDK's HTTP Request class. You can find the documentation in the class HTTP Request section of the network documentation.
Setup
To follow the steps in this document and run the example app, you need an Adafruit IO account. If you do not already have an account, sign up for one here.
When you're finished, open the manifest of the example app and replace the value of the username parameter of the config object with your username.
{
    ...
    "config": {
        "username": "YOUR_USERNAME_HERE",
    ...
}
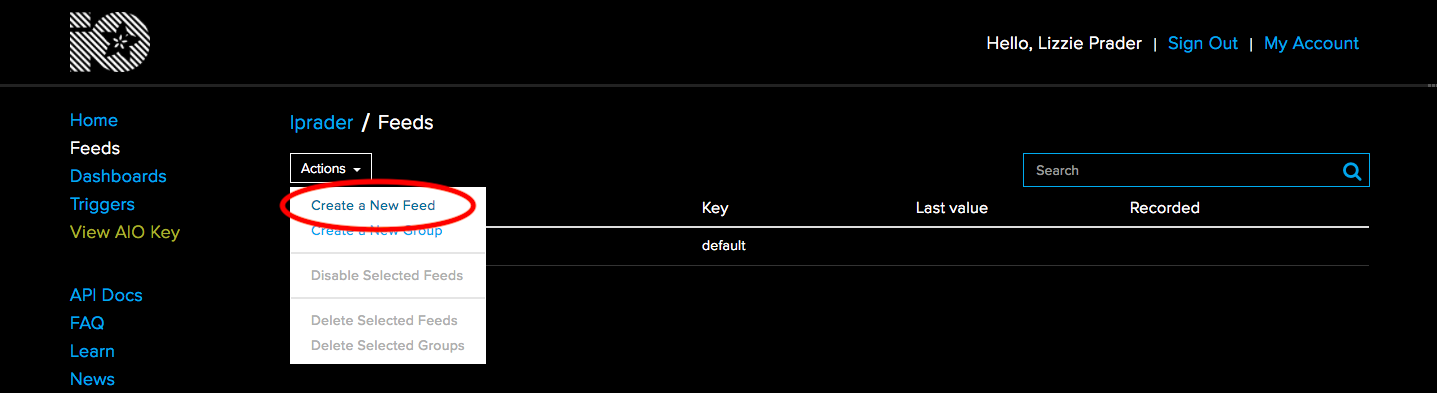
You will also need to create a feed. You can do that by following these steps:
- Click Feeds in the sidebar
- Select Create a new Feed from the Actions menu
- Give your feed a name and click the Create button
Replace the value of the feedKey parameter of the config object with the name of your feed.
{
    ...
    "config": {
        ...
        "feedKey": "YOUR_FEED_KEY_HERE",
    ...
}
Creating a Request
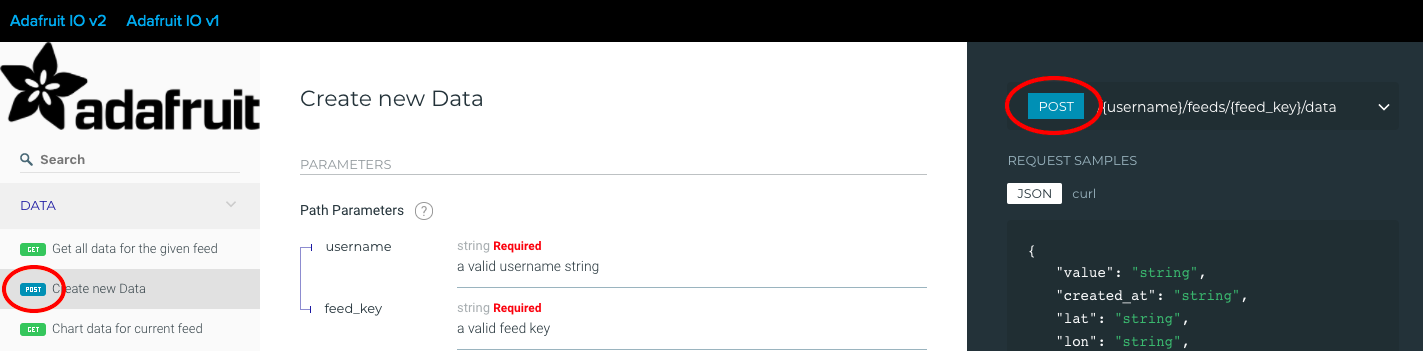
A new HTTP Request is configured using a dictionary of properties. For more details about each property, see the class HTTP Request section of the network documentation. This section shows how each property in the request to stream data to an Adafruit IO feed corresponds to the Create new Data section of Adafruit's REST API documentation.
host
The host property includes only the domain. Do not include the protocol, port, or path.
let request = new Request({
    host: "io.adafruit.com",
    ...
});
path
The Path Parameters are username and feed_key. Click on the path template in the top right corner, to see the format of the full request URL:
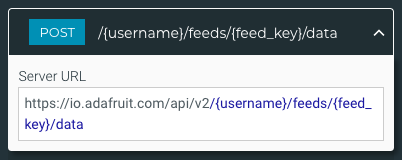
The path parameter must match this format, so the host is removed from the sample URL and the variables (denoted by curly braces) are replaced with the username and feedKeyparameters specified in the manifest.
let request = new Request({
    ...
    path: `/api/v2/${config.username}/feeds/${config.feedKey}/data`,
    ...
});
method
As you see in the left and right sidebars, this should be a POST request.
let request = new Request({
    ...
    method: "POST",
    ...
});
headers
The Moddable SDK automatically adds
Host and
Connection headers to every request, and a
Content-Length header to every request with a body.
The example app specifies two additional headers:
X-AIO-Key and
Content-Type.
let request = new Request({
    ...
    headers: [ "X-AIO-Key", config.AIOKey, "Content-Type", "application/json" ],
    ...
});
X-AIO-Key
The
X-AIO-Key header is used for authentication. Most REST APIs require some sort of authentication. Services that are intended for use in larger scale, enterprise solutions, often require applications to go through complex processes to generate signatures/tokens and hash data.
Adafruit IO is designed for makers. The authentication process is very simple, and is specified in the
Authentication section at the top of their
REST API documentation:
"Authentication for every API request happens through the X-AIO-Key header or query parameter and your IO API key...You can access this key right from the right-hand side of your dashboard or from an individual feed page."

All you have to do in the example app is replace the value of the AIOKey parameter of the config object with your AIO key.
{
    ...
    "config": {
        ...
        "AIOKey": "YOUR_AIO_KEY_HERE",
    ...
}
The documentation says you can also authenticate with an X-AIO-Key query parameter. To authenticate with a query parameter instead, add a query string to the end of the path parameter and remove the corresponding items from the headers array.
let request = new Request({
    ...
    path: `/api/v2/${config.username}/feeds/${config.feedKey}/data?X-AIO-Key=${config.AIOKey}`,
    headers: [ "Content-Type", "application/json" ],
    ...
});
Content-Type
The Adafruit IO REST API documentation does not mention a Content-Type header anywhere. This is not uncommon, although some servers, including Adafruit IO, return an error code if this header is not included. It is recommended that you include a Content-Type header in requests with a payload. This ensures that the server knows how to interpret the data it receives.
There are many possible values for this header. The responses to this Stack Overflow thread provide a good summary of its structure and some of the common values.
In this example we specify the type application/json because the body of the request is in JSON format.
body
The Request Body is a JSON object. It must include a value field, and can optionally include latitude, longitude, elevation and date/time values.
The example app only includes the required value field. The body parameter has to be a String or an ArrayBuffer, so the JSON object is converted into a string:
let request = new Request({
    ...
    body: JSON.stringify({ value: data }),
    ...
});
Other servers might require the body to be some sort of binary data, such as an image or sound file. The service's REST API documentation will tell you what format the body must be in and should give you the expected value for the Content-Type header. The body of the HTTP request should be an ArrayBuffer.
Response
When the Adafruit IO HTTP server responds to a request, the callback function of HTTP request is called. The callback function is invoked for several different purposes by the request.
To trace everything that an HTTP server sends back to the console, you can use the following:
request.callback = function(message, value, etc) {
    if (value) trace(`value: ${JSON.stringify(value)}`);
    if (etc) trace(`, etc: ${JSON.stringify(etc)}\n`);
    else trace("\n");
}
The Adafruit IO example application filters what is traced so it's easier to tell at a glance whether or not data was sent.
request.callback = function(message, value, etc) {
    if ((message == 2) && (value == "status")) {
       if (etc == "200 OK") {
           trace(`Sent data "${data}"\n`);
        } else {
           trace(`Error sending data "${data}". Error code: ${etc}\n`);
        }
     }
}
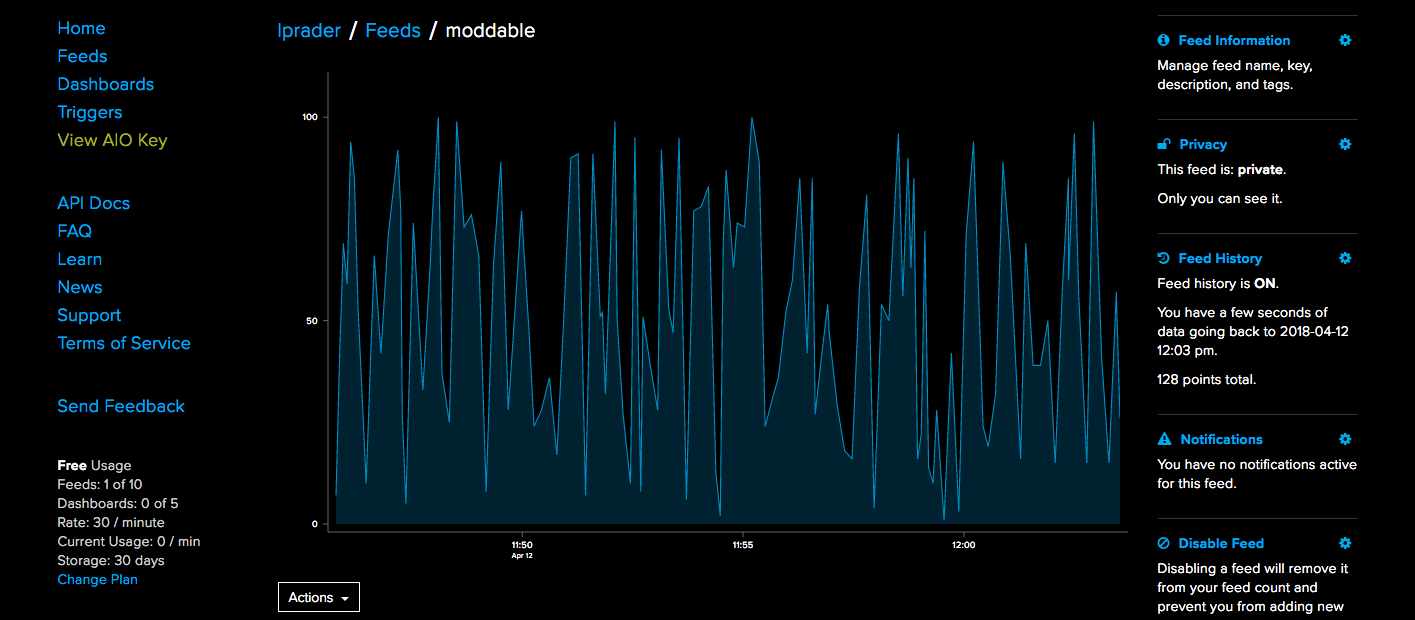
You can also view and download data sent to your feeds by clicking on them from your dashboard.
Conclusion
Translating REST APIs into HTTP requests is a simple and straightforward process, but it is a skill worth learning. A basic understanding of how to use REST APIs enables developers to write applications that communicate with a huge variety of web services and create more compelling connected products.
This article is part one of a series about using web services in applications built with the Moddable SDK. Stay tuned for the next post on making secure network requests.