Copyright 2016-2020 Moddable Tech, Inc.
Revised: December 1, 2020
This document describes how to set up and build Moddable applications for the Silicon Labs Gecko boards and processors.
The Gecko series of processors from Silicon Labs are low-powered ARM based devices.
With the goal of consuming very little current, the Geckos are highly configurable. Peripherals, subsystems, clocks and oscillators can be enabled or disabled with high specificity.
Sleep is another important aspect of the Gecko platform. To achieve low power goals, the device must sleep when it is not active. Managing the various sleep modes and cycles is a big focus of the Gecko implementation.
Moddable on Gecko runs on the bare metal. It is very efficient and gives a great deal of control to the developer. However, expertise and time are required to get it right.
Four models of Gecko are supported in the Moddable SDK today.
| Device |
Platform identifier |
Key features |

Giant Gecko |
gecko/giant |
EFM32GG
48 MHz processor
128 KB RAM
1 MB flash
External pins
We've worked with the EFM32GG STK3700 - Giant Gecko Starter Kit
|

Mighty Gecko |
gecko/mighty |
EFR32MG
Radio
External pins
We've worked with the EFR32 Mighty Gecko Starter Kit. |

Thunderboard Sense 2 |
gecko/thunderboard2 |
EFR32MG
Radio
Humidity and Temperature Sensor
UV and Ambient Light Sensor
Pressure Sensor
Indoor Air Quality and Gas Sensor
6-axis Inertial Sensor
Digital Microphone
High brightness LEDs
Hall-effect Sensor
We've worked with the Thunderboard™ Sense 2 IoT Development Kit. |

Blue Gecko |
gecko/blue |
EFR32BG
BLE
Radio
External pins
We've worked with the EFR32 Blue Gecko Bluetooth Starter Kit. |
After the initial setup, there are two major steps to build a Moddable application for Gecko.
First, the JavaScript application, assets, modules and XS runtime are built into an archive using Moddable's mcconfig tool. This produces a xs_gecko.a archive file.
Second, a Simplicity Studio project builds an application stub and device libraries which are linked to the Moddable archive.
After the application is built, Simplicity Studio uploads the binary to the device and can be used to debug C code. JavaScript code can be debugged with the xsbug debugger as described below.
Each major Gecko model is represented by a sub-platform in the model build, both in the manifests and in the command line arguments to mcconfig.
| Platform |
Subplatform |
Platform Flag |
Device |
| gecko |
giant |
-p gecko/giant |
Giant Gecko |
| gecko |
mighty |
-p gecko/mighty |
Mighty Gecko |
| gecko |
thunderboard2 |
-p gecko/thunderboard2 |
Thunderboard Sense 2 |
| gecko |
blue |
-p gecko/blue |
Blue Gecko |
The platform flag is used with mcconfig.
$ mcconfig -d -m -p gecko/mighty
If the platform flag specifies a subplatform, then mcconfig will load the build rules from $MODDABLE/tools/mcconfig/platform/mk.subplatform.mk.
In the manifest.json file, the platforms section can specify both platform and platform/subplatform subsections. The items are merged with more specific platform/subplatform specifications overriding general platform specifications.
To get started, install Simplicity Studio. These instructions are based on on MacOS with v.4.2 of Simplicity Studio.
Plug in your board when launching for the first time so that Simplicity Studio updates with the correct SDKs. Install 32 bit MCU, Flex and Bluetooth.
As of this writing, the current versions are:
Gecko SDK Suite - 2.2.2
32-bit MCU SDK - 5.4.0.0
Flex SDK - 2.2.2.1
Bluetooth SDK - 2.8.1.0
If the SDK version changes, or you wish to use a specific SDK version, change the SDK_BASE build define in $MODDABLE/tools/mcconfig/gecko/make.subplatform.mk.
Each time you work with a new board variant, install a sample project for your device or board.
When you have your device connected, choose an example project from the Launcher screen:
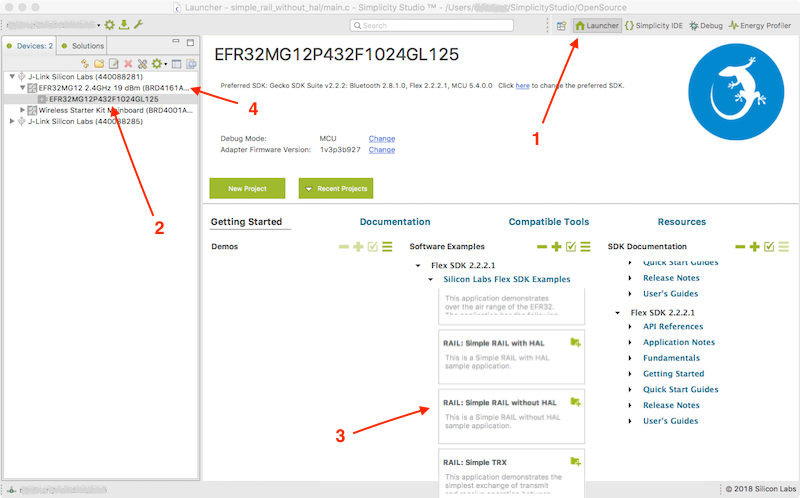
- Choose the Launcher
- Choose your device
- Find an example for your device
We've used
| Device |
Example project |
| Giant Gecko |
STK3700_powertest |
| Mighty Gecko |
simple_rail_without_hal, simple_trx_with_fifo
|
| Thunderboard Sense 2 |
soc-thunderboard-sense-2, soc-empty
|
| Blue Gecko |
soc-ibeacon, soc-thermometer
|
| Build, install and run the sample to become familiar with the process. |
|
Note: It is necessary to start with an example project with your board connected so that Simplicity Studio will populate the build rules for the project with the appropriate values for your device.
Also note: There are many variants of a family of devices.
Please note the board (4) and part (2).
Export the part and board as GECKO_PART and GECKO_BOARD.
export GECKO_PART=EFR32MG12P432F1024GL125
export GECKO_BOARD=BRD4161A
This allows the build system to find the appropriate register definition files, configuration, etc. for your specific board.
Thunderboard Sense 2: if you start with soc-thunderboard-sense-2, you will have to change the size of the __STACK_SIZE and __HEAP_SIZE.
See the Notes and Troubleshooting section below.
Follow the macOS [Host environment setup](../../Moddable SDK%20-%20Getting%20Started.md) section of the Moddable Getting Started guide.
Use mcconfig to build the moddable library and application for your Gecko sub-platform:
$ cd $(MODDABLE)/examples/helloworld
$ mcconfig -d -m -p gecko/mighty
Note: the -d option to mcconfig builds the debug version. helloworld uses the debugger to display its output.
See the Debugging section below for instructions on connecting to xsbug.
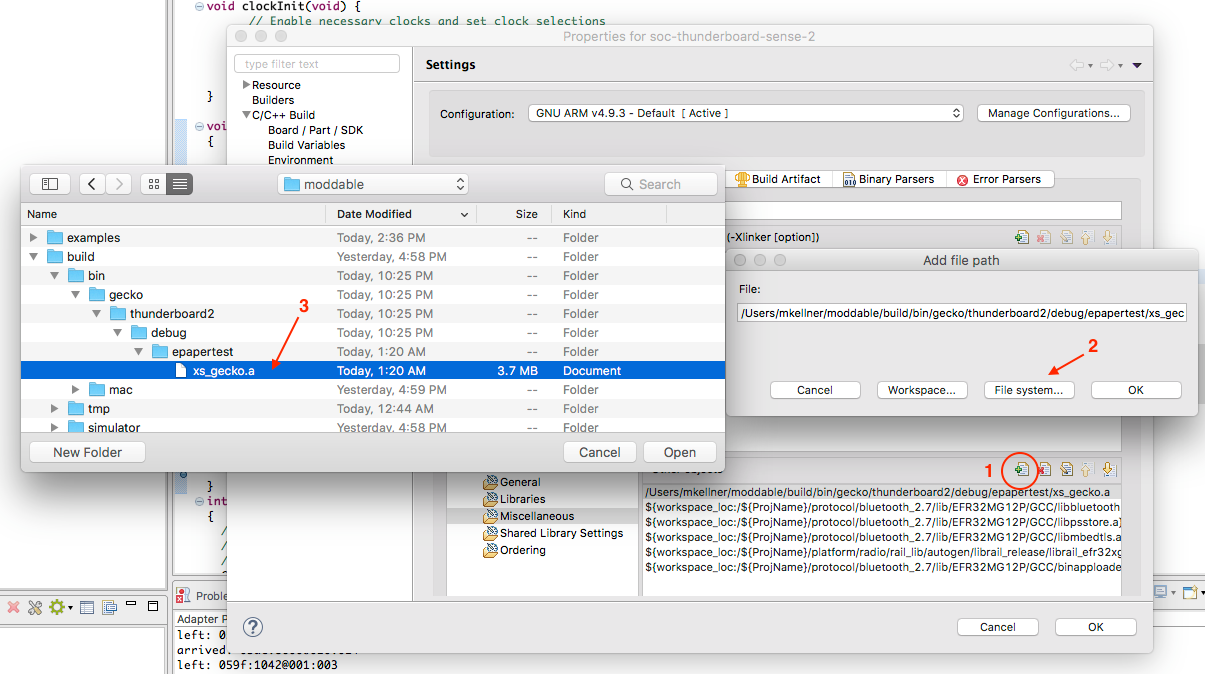
It is necessary to change certain settings in the Simplicity Studio project to build an application using the Moddable SDK.
Open the properties window for the project and select C/C++ Build->Settings.
- In the Other Objects section, click the add document icon
 to add the Moddable archive to your project.
-
Select "File system..."
-
Navigate to your moddable directory and select the xs_gecko.a archive file.
It is located in $MODDABLE/build/bin/gecko/platform/debug/application/xs_gecko.a
You will need to change this file path to match the application you are building.
You may also need to add the math library:
Open the properties window for the project and select C/C++ Build->Settings.
- In the GNU ARM C Linker section, select Libraries.

-
Click the add document icon to add a library to your project.
-
Type in 'm' to add the "Math" library.
In the Simplicity Studio sample app's main.c, add a few things:
int gResetCause = 0;
uint32_t gWakeupPin = 0;

void assertEFM() { } // maybe  void assertEFM(const char *file, int line) {} depending on your SDK
Near the beginning of main(), add some code to get the reset cause. This must be done early in device initialization.
  gResetCause = RMU_ResetCauseGet();
  if (gResetCause & (RMU_RSTCAUSE_EM4RST |  RMU_RSTCAUSE_EXTRST)) {
	  gWakeupPin = GPIO_EM4GetPinWakeupCause();
  }
  RMU_ResetCauseClear();
Do other setup for your device/application as necessary.
Add a call to xs_setup() to configure the XS runtime and debugger:
xs_setup();
In your main loop, call xs_loop(); repeatedly.
while(1) {
	xs_loop();
}
The pins and features of the Gecko family are highly configurable. For each application, the specific configuration is defined in the application's manifest.json file.
In the manifest.json platforms:defines section there are defines for the various peripherals to specify what pins, ports, clocks, irq, etc. to use.
    "gecko/mighty": {
        "defines": {
            "sleep": {
                "idleLevel" : 3,
                "retention": { "memory": false, "gpio": false },
                "wakeup": { "pin": 7, "port": "gpioPortF", "level": 0, "register": "GPIO_EXTILEVEL_EM4WU1" },
            },
The various pin/port/location values for specific interfaces can be found in the particular data sheet for your chip family.
Native code is debugged with Simplicity Studio.
XS script code can be debugged with xsbug by using a FTDI adapter. On the adapter, the pins RX, TX and GND will be used.
On your device, you will need to use a UART or USART and specify it in a defines section for your platform. Other required definitions include the TX and RX pins and location. Baud rate can also be defined, defaulting to 115200. Examples are shown below.
Prior to launching your application from Simplicity Studio, start the xsbug.app application and use serial2xsbug to connect the FTDI adapter.
$ open $MODDABLE/build/bin/mac/release/xsbug.app
$ serial2xsbug /dev/cu.usbserial-AL035VAU 115200 8N1
In this case, the FTDI adapter is identified by the MacOS as /dev/cu.usbserial-AL035VAU.
An example, using UART1 on Giant Gecko, USART1 on Mighty Gecko and USART0 on Thunderboard 2:
"platforms": {
	"gecko/giant": {
		"defines": {
			"debugger": {
				"interface": { "UART": 1 },
				"location": 2,
				"tx" : { "pin": 9, "port": "gpioPortB" },
				"rx" : { "pin": 10, "port": "gpioPortB" },
			},
		},
	},
	"gecko/mighty": {
		"defines": {
			"debugger": {
				"interface": { "USART": 1 },
				"location": 19,
				"tx" : { "pin": 11, "port": "gpioPortD" },
				"rx" : { "pin": 12, "port": "gpioPortD" },
			},
		},
	},
	"gecko/thunderboard2": {
		"defines": {
			"debugger": {
				"interface": { "USART": 0 },
				"tx" : { "pin": 3, "port": "gpioPortF", "location": 27 },
				"rx" : { "pin": 4, "port": "gpioPortF", "location": 27 },
			},
		},
	},
An alternate configuration, using USART0 on Giant Gecko,and USART3 on Mighty Gecko:
"platforms": {
	"gecko/giant": {
		"defines": {
			"debugger": {
				"interface": { "USART": 0 },
				"location": 5,
				"tx" : { "pin": 0, "port": "gpioPortC" },
				"rx" : { "pin": 1, "port": "gpioPortC" },
			},
		},
	},
	"gecko/mighty": {
		"defines": {
			"debugger": {
				"interface": { "USART": 3 },
				"location": 10,
				"tx" : { "pin": 6, "port": "gpioPortB" },
				"rx" : { "pin": 7, "port": "gpioPortB" },
			},
		},
	},
The Gecko series devices are designed to use little power. Careful programming and management of sleep cycles are necessary to optimize power usage for your application.
The Moddable SDK sleeps at idle times, while waiting for sensor or user input, or until a specific time for sensor output. Fewer interfaces are active at higher sleep levels, so it may be necessary to reduce the sleep level for your application to operate correctly.
By default, Moddable uses Sleep level EM3 while waiting. Certain Gecko interfaces are shut down at level EM3. For example, while operating the Mighty Gecko radio, the sleep level must be constrained to EM1.
Gecko devices also have a deep sleep level EM4. At this level, the device is almost entirely shut off, including RAM, peripherals and most clocks. While in this state, the device can be awoken by a signal on an external GPIO pin or a timer expiration using a low power clock. When awoken, the device reboots.
During EM4 sleep, a small amount of memory can be kept active at the expense of a slightly increased power draw. The GPIO state can also be retained.
At wakeup, an application can check for the cause of wakeup and perform actions to restore state from some data stored in the retention memory.
"include": [
    "$(MODULES)/base/sleep/manifest.json",
],

"platforms": {
	"gecko/mighty": {
		"defines": {
			"sleep": {
				"idleLevel" : 3,
				"retention": { "memory": false, "gpio": true },
				"wakeup": { "pin": 7, "port": "gpioPortF", "level": 0, "register": "GPIO_EXTILEVEL_EM4WU1" },
			},
		},
idleLevel: Specifies the maximum sleep level allowed during idle periods.
retention:memory: enables or disables retention memory.
retention:gpio: enables or disables gpio retention state.
wakeup:port and pin defines the pin used to wake from EM4.
wakeup:level indicates whether pulling the wakeup pin low (0) or high (1) wakes the device.
wakeup:register specifies which GPIO interrupt register to use.
The various Gecko devices specify port/pin combinations that will wake the device from EM4 sleep. The device's data sheet will specify what pins can be used, and what GPIO interupt register to use.
The JavaScript Sleep class provides access to Gecko's sleep functions to scripts.
import Sleep from "sleep";
if (Sleep.getWakeupCause() & Sleep.ExternalReset)
	trace("woke up by button\n");
To determine the cause of wakeup, use:
let wakeupcause = Sleep.getWakeupCause();
wakeupcause is a bitmask of:
Sleep.PowerOnReset      = 0b00000001;		// power applied
Sleep.ExternalReset     = 0b00000010;		// reset button
Sleep.SysRequestReset   = 0b00000100;		// software reset
Sleep.EM4WakeupReset    = 0b00001000;		// woke from EM4
Sleep.BrownOutReset     = 0b00010000;		// power dipped too low
Sleep.LockupReset       = 0b00100000;		// device hung
Sleep.WatchdogReset     = 0b01000000;		// watchdog timer expired
During EM4 sleep, RAM is shut off. A small amount of memory persists, and is available for retrieval after wakeup.
	let index;

	index = Sleep.getPersistentValue(0);
	Sleep.setPersistentValue(0, ++index);
To store a 32-bit value in one of 32 locations, use:
Sleep.setPersistentValue(location, value);
To retrieve a 32-bit value from location, use:
value = Sleep.getPersistentValue(location);
To enter EM4 sleep, use:
	let sleepTime = 10000;
	Sleep.sleepEM4(sleepTime);
This sleeps the device in the lowest power mode for about 10 seconds.
For devices that use the Cryotimer: the sleepTime value is reduced to a base 2 value as that is what is supported by the Cryotimer. That is, sleepTime is 1, 2, 4, 8, 16, 32... ms.
On Gecko, GPIO pins are specified by port and pin.
let led1 = new Digital({pin: 4, port: "gpioPortF", mode: Digital.Output});
When using the Digital Monitor, the port is used to create the pin, but is ignored when discerning the interrupt. That is, a monitor created for GPIO PC0 (GPIO port C, pin 0) will also be triggered by PD0 (and PA0, PB0, etc.)
Gecko devices have a number of analog inputs and can be configured to use various pins and voltage references.
	"gecko/mighty": {
		"defines": {
			"analog": {
				"interface": { "ADC": 0 },
				"ref": "adcRefVDD",
				"input1": "adcPosSelAPORT2XCH9",
				"input2": "adcPosSelAPORT3YCH22",
			},
			"modules": {
				"*": [
					"$(BUILD)/devices/gecko/analog/*",
				],
			},
interface specifies which ADC interface to use.
input_n_ specifies a particular pin for input. Moddable currently supports 5 concurrent input sources on Gecko.
adcPosSelAPORT2XCH9 - APORT2X, Channel 9 refers to pin PC9 on the Mighty Gecko.
See your Gecko device data-sheet for the values to use to set a particular pin for analog input.
ref specifies an analog voltage reference source. The default value is adcRefVDD. Other possibilities include adcRef1V25, adcRef2V5 and others, as included by your device.
import Analog from "analog"
...
let voltage1 = Analog.read(1);
let voltage2 = Analog.read(2);
Analog.read(1) reads from input1 described in the manifest.json fragment above. Analog.read(2) reads from input2 described in the manifest.json fragment above.
Gecko devices can run the SPI interface over a number of USART ports.
The manifest.json file contains defines for the base SPI pins
	"include": [
		"$(MODULES)/pins/spi/manifest.json",
	],
	"gecko/mighty": {
		"defines": {
			"spi": {
				"interface": { "USART": 1 },
				"location": "1",
				"mosi": { "pin": "0", "port": "gpioPortD" },					"miso": { "pin": "1", "port": "gpioPortD" },
				"sck": { "pin": "2", "port": "gpioPortD" },
			},
			"ili9341": {
				"hz": 40000000,
				"cs": { "pin": 9, "port": "gpioPortA", },
				"dc": { "pin": 6, "port": "gpioPortB", },
			}
		},
This section of the manifest.json defines the SPI pins, ports, and locations, and which interface to use.
The interface definition specifies which USART interface to use.
location specifies which pin configuration to use for the interface. See your Gecko device data-sheet for which pins refer to what USART location.
Other definitions for a specific SPI device's driver will define the CS (chip-select) pin, HZ (speed in hz) and other driver specific defines.
Gecko devices have a number of I2C interfaces.
	"include": [
		"$(MODULES)/pins/i2c/manifest.json",
	],
	"gecko/mighty": {
		"defines": {
			"i2c": {
				"interface": { "I2C": 0 },
				"sda": { "pin": 11, "port": "gpioPortC", "location": 16 },
				"scl": { "pin": 10, "port": "gpioPortC", "location": 14 },
			},
The interface definition specifies which I2C interface to use.
In this example, I2C0 is used. The pin PC11 is the SDA pin for I2C0 at location 16 (I2C0_SDA#16). The pin PC10 is the SCL pin for I2C0 at location 14.
location specifies which pin configuration to use for the interface. See your Gecko device data-sheet for which pins refer to what I2C location.
Note: some Gecko devices split the location for various pins. The I2C defined in the manifest.json fragment above shows a different pin location for sda and scl.
Using the radio on Mighty Gecko requires additional work in Simplicity Studio.
As a base application, use RAIL: Simple TRX with FiFo. After creating the sample project, Simplicity Studio will open a application configuration window.
Click the "Generate" button to create the radio support files for the project.
The changes to the project's main.c are a bit more involved than the simple examples above.
For the simple_rail_without_hal example:
$MODDABLE/build/devices/gecko/project/radio/simple_rail_without_hal/main.c
For the simple_trx_with_fifo example:
$MODDABLE/build/devices/gecko/project/radio/simple_trx_with_fifo/main.c
Copy the particular main.c file into your Simplicity Studio's project, replacing the existing main.c.
Continue with Build xs_gecko.a archive above.
The Moddable SDK includes Bluetooth Low Energy (BLE) protocol support for Blue Gecko devices. Our BLE API documentation includes details for building Blue Gecko BLE apps.
- During the final link, if Simplicity Studio does not find the Cryotimer routines or defines, copy the code and header files to your project.
em_cryotimer.h is located in: /Applications/Simplicity Studio.app/Contents/Eclipse/developer/sdks/gecko_sdk_suite/v2.2/platform/emlib/inc/em_cryotimer.h
em_cryotimer.c is located in: /Applications/Simplicity Studio.app/Contents/Eclipse/developer/sdks/gecko_sdk_suite/v2.2/platform/emlib/src/em_cryotimer.c
-
During the final link, if Simplicity Studio does not find the xs_gecko.a file, either the library path is incorrect, or you have not built the xs_gecko.a file with mcconfig.
  $ cd .../application_path
  $ mcconfig -d -m -p gecko/mighty
-
Unexplainable crashes can occur if Stack or Heap space run out:
Depending on the processor and project configuration, you may need to adjust the stack size and heap size of the project.
In GNU ARM C Compiler -> Symbols and GNU ARM Assembler -> Symbols, add a __STACK_SIZE and/or __HEAP_SIZE
__STACK_SIZE=0x4000
__HEAP_SIZE=0xA000
- Some Simplicity Studio example radio projects use a fixed size packet length.
You can increase that by changing the Radio Profile. When starting a new radio project, Simplicity Studio creates the ISC file, select the Radio Configuration tab and change the Select a radio PHY for selected profile to Custom Settings.
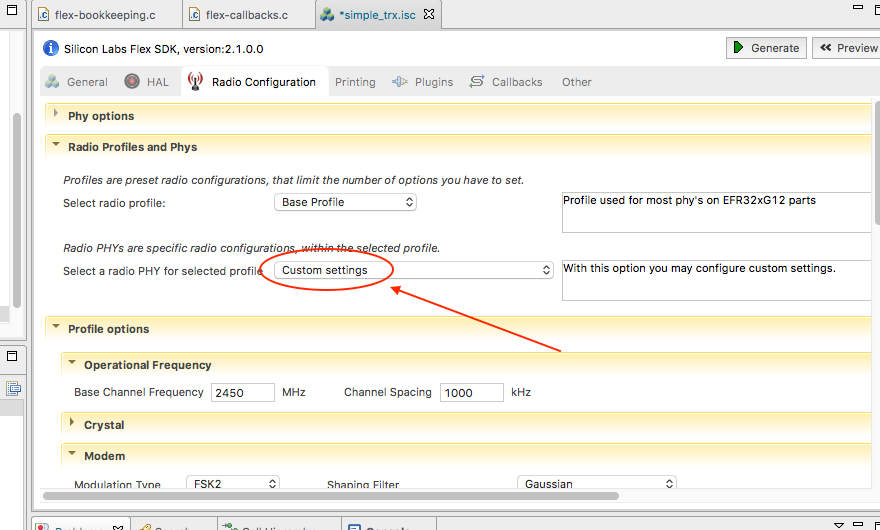
Scroll down to Profile options->Packet and select the Frame Fixed Length tab.
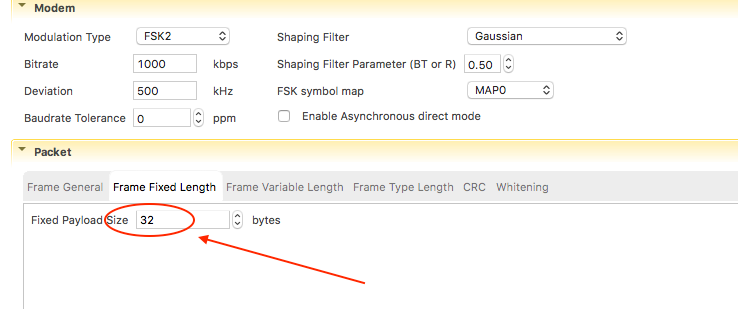
Change the payload size to the size you need. Then click the Generate button to create the radio support files for the project and rebuild the Simplicity Studio project.
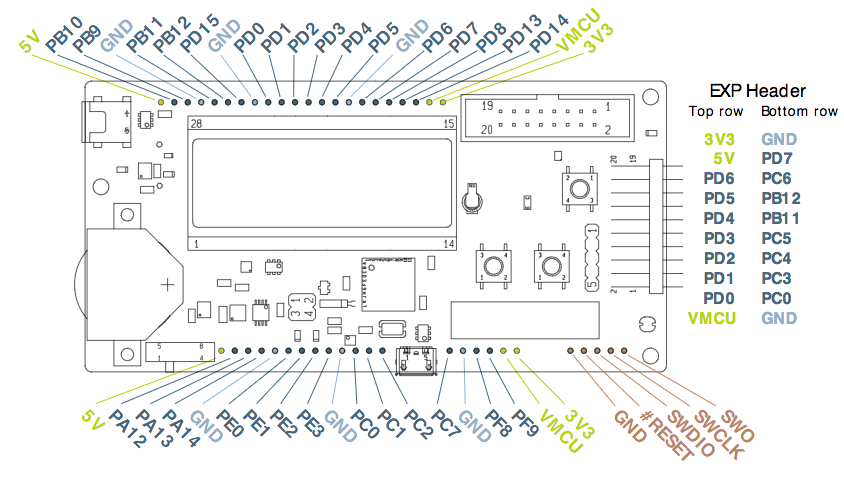
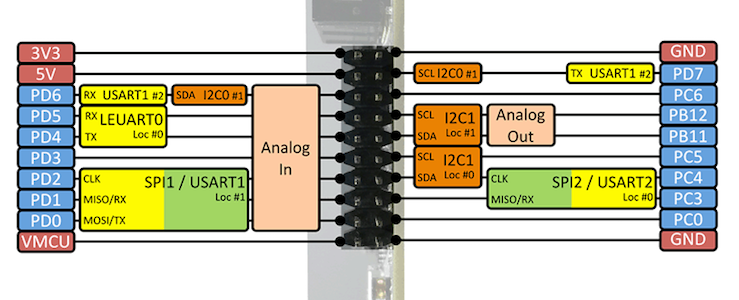
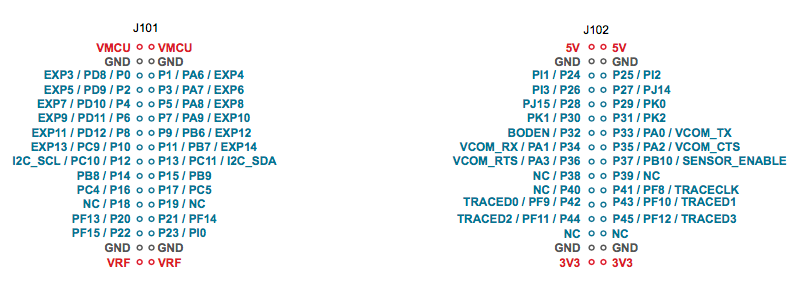
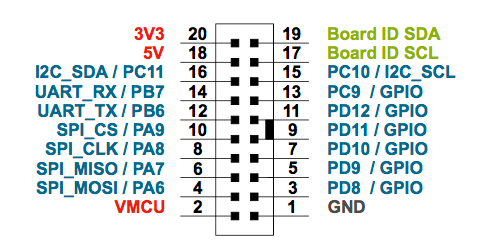
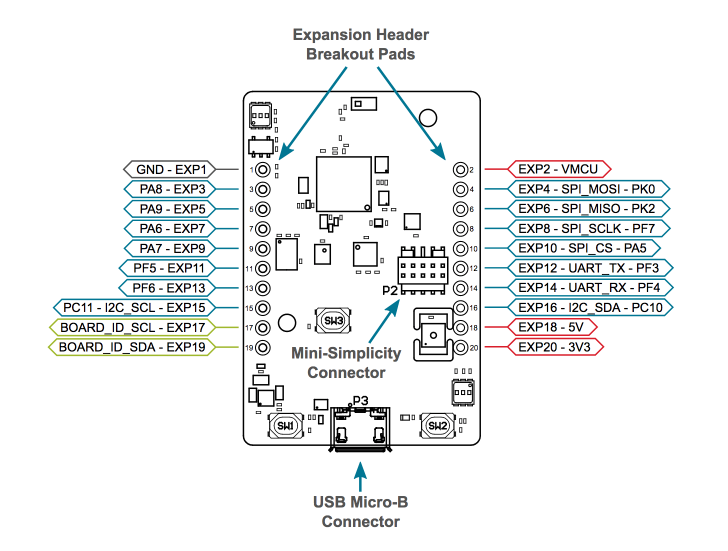
The Gecko reference boards expose many pins. There is a pre-populated expansion connector on the right side of the board, and rows of pins at the top and bottom of the board.
For most Moddable examples, the pins used are located on the expansion connector for easy access.
Below are some default hookup schemes:
Giant Gecko locates the xsbug serial pins on the top row of pins, other peripherals on the expansion port.
| Pin |
Interface / Location |
Hardware |
| PB9 |
UART1_TX#2 |
FTDI TX |
| PB10 |
UART1_RX#2 |
FTDI RX |
| GND |
GND |
FTDI GND |
| Pin |
Interface / Location |
Hardware |
| PD0 |
USART1_TX#1 |
SPI_MOSI |
| PD1 |
USART1_RX#1 |
SPI_MISO |
| PD2 |
USART1_SCLK#1 |
SPI_SCK |
| PD3 |
GPIO |
SPI_CS |
| PC3 |
GPIO |
D/C |
| PC4 |
GPIO |
Busy |
| PC0 |
GPIO |
RST |
| Pin |
Interface / Location |
Hardware |
| PD6 |
I2C0_SDA#1 |
Sensor SDA |
| PD7 |
I2C0_SCL#1 |
Sensor SCL |
| Pin |
Interface / Location |
Hardware |
| PE2 |
LED0 |
Right LED |
| PE3 |
LED1 |
Left LED |
| PB9 |
SW0 |
Push Button 0 |
| PB10 |
SW1 |
Push Button 1 |
| Pin |
Interface / Location |
Hardware |
| PD11 |
USART1_TX#19 |
FTDI RX |
| PD12 |
USART1_RX#19 |
FTDI TX |
| GND |
GND |
FTDI GND |
| Pin |
Interface / Location |
Hardware |
| PA6 |
USART2_TX#1 |
SPI_MOSI |
| PA7 |
USART2_RX#1 |
SPI_MISO |
| PA8 |
USART2_SCLK#1 |
SPI_SCK |
| PA9 |
GPIO |
SPI_CS |
| PD9 |
GPIO |
D/C |
| PD10 |
GPIO |
Busy |
| PD8 |
GPIO |
RST |
| Pin |
Interface / Location |
Hardware |
| PC11 |
I2C0_SDA#16 |
Sensor SDA |
| PC10 |
I2C0_SCL#14 |
Sensor SCL |
| Pin |
Interface / Location |
Hardware |
| PF4 |
LED0 |
Right LED |
| PF5 |
LED1 |
Left LED |
| PF6 |
SW0 |
Push Button 0 |
| PF7 |
SW1 |
Push Button 1 |
| Pin |
Interface / Location |
Hardware |
| PF3 |
USART0_TX#27 |
FTDI RX |
| PF4 |
USART0_RX#27 |
FTDI TX |
| GND |
GND |
FTDI GND |
| Pin |
Interface / Location |
Hardware |
| PK0 |
USART2_TX#29 |
SPI_MOSI |
| PK1 |
USART2_RX#30 |
SPI_MISO |
| PF7 |
USART2_SCLK#18 |
SPI_SCK |
| PA5 |
GPIO |
SPI_CS |
| PF6 |
GPIO |
D/C |
| PF5 |
GPIO |
Busy |
| PA7 |
GPIO |
RST |
| Pin |
Interface / Location |
Hardware |
| PC10 |
I2C0_SDA#15 |
Sensor SDA |
| PC11 |
I2C0_SCL#15 |
Sensor SCL |
| Pin |
Interface / Location |
Hardware |
| PD8 |
LED_RED |
Red LED |
| PD9 |
LED_GREEN |
Green LED |
| PD14 |
PUSH_BUTTON0 |
Push Button 0 |
| PD15 |
PUSH_BUTTON1 |
Push Button 1 |
| App |
Feature |
Giant |
Mighty |
Thunderboard Sense 2 |
Blue |
| helloworld |
xsbug |
x |
x |
x |
x |
| base/sleep |
sleep |
x |
x |
x |
|
| network/ble/* |
BLE |
|
|
|
x |
| drivers/TMP102 |
I2C |
x |
x |
|
|
| drivers/HMC5883L |
I2C |
x |
x |
|
|
| drivers/ls013b4dn04 |
Sharp Memory Display |
x |
x |
x |
|
| pins/monitor |
GPIO Interrupt |
|
x |
|
|
| pins/simpleAnalog |
analog |
|
x |
|
|
| piu/balls |
SPI / ili9341 |
x |
x |
|
|
| piu/transitions |
SPI / ili9341 |
x |
x |
|
|
| piu/cards |
SPI / ili9341 |
x |
x |
|
|
| piu/love-e-ink |
SPI / destm32s |
x |
x |
|
|
| drivers/radio/radiotest |
radio |
|
x |
|
|